We literally spent the winter in Las Palmas de Gran Canaria. El muelle deportivo de Las Palmas is a huge marina in the centre of the city. At walking distance or by bus (bus pass available at the marina’s mini-market) you can find whatever you need. We enjoyed the spannish/canarian culture (carnivals, holy week, etc.) and the weather has been good (even though locals say it’s been one bad winter). Las Palmas is situated north of Gran Canaria ; the trade winds blow from the north 90% of the time and clouds bump into the mountains/volcano, leaving Las Palmas under a layer of clouds most of the time while the south of the island is mostly sunny (and free of wind). We also experienced one day of light calima, which at first I thought was fog (it is sand dust).


We have been happily socialising:
- on our pontoon, some weeks we were more than 5 live-aboard families, some of them preparing for the Atlantic crossing
- in the Club Varadero, where they met locals kids
- in Las Palmas’ kayak club, they took kayak lessons with others kids and live-aboard kids 3 days a week and enjoyed being part of the club’s life.


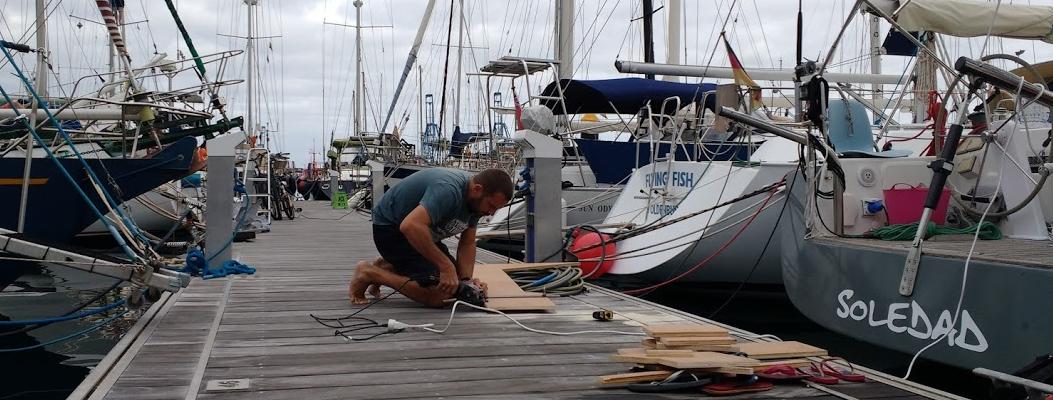
As usual, a stop in a marina also means I had to spent some time on fixing a few things and improving other things in order to sailing back up to the Med, up to Greece hopefully. In that respect, Soledad is not better or worst than other boats : all boat are under maintenance or repair while in the marina. There is always something that breaks or wears out – boats are enduring wind, rain, salt water and sun 365 days a year. All captains have to work on their backlog items before being ready to sail away.
Going north from Canary islands will most probably mean sailing against the trade winds (and swell) for some days, nothing exceptional… but still something that requires a bit of preparation on our side. We expect to take 3 to 4 days to get to Madeira, then 4 to 5 days to get back to mainland Portugal or Spain.
So, here is what happened on Soledad in Las Palmas.
Fresh water system
The fresh water circuit on our Hanse 430e is pretty simple – which is a good thing. A single water tank (350 litres), a pressure pump, a boiler (working with shore power or exchanging heat with our main engine), 3 taps and 3 showers. The only complain I have is about access to the various parts of the circuit: the pump and its connection to the circuit are located in our aft heads.
The connection from the pressure pump to the circuit had been leaking for some months (or maybe years). The part itself was made of some hard rubber (or soft plastic, you decide…) and I was afraid to touch it or to tighten it more – it’s the central part of our fresh water system: I really wanted it to stay in one piece. In Las Palmas, I managed to get a good access to it (that was the hardest part of the job) and to remove it carefully. It’s been replaced by a new brass element. No more leaks, job done.
I also added a small pressure accumulator that helps by maintaining a constant pressure in the circuit and makes the pump work smoothly. That was a simple job and the change is tremendous, how come Hanse did not install one from the start ?!
Mast head works

Since Portugal, the VHF antenna (shared by the radio and the AIS) was not working properly. In Graciosa island, I discovered that the connection at the mast foot was bad (connector had not been not soldered to the antenna cable). In Las Palmas, we had plenty of time so I decided to get the complete cable and antenna assembly replaced. I went for a Glomex PRA110 ‘professional’ antenna because it has a N-type connector (waterproof by design – the common PL connectors are not waterproof) and for low-loss cable. I also wanted to install the cable inside the electric cable tube inside the mast – the previous cable was not in it. Unfortunately, this proved to be impossible without unstepping the mast. I decided to add a protection sleeve around the antenna cable (I remove the sleeve from an unused double-braid line and slide it onto the new antenna cable). Easier written than done: it took me one complete morning and two hands full of blisters. This is not an ideal solution, but it’s still an improvement. The sleeve around the cable protects the cable from the rest of the lines in the mast, and helps reducing the noise when the cable moves (when anchoring with a bit of swell, for example).
While up on the mast, I also took time to change our 10 years old SIMRAD wind mast head unit (which I suspect was a bit optimistic and sometimes just stopped spinning for no reason) by a new one, a B&G 608 which is a drop-in replacement (same bracket, same connector – well done Navico, so unusual!). I changed also the mooring LED light, the VHF antenna support and checked the mainsail halyard 2:1 fixed end at the top of the mast.
On the deck side, all electric/electronic cables (4 of them: VHF, wind sensor, steaming light, mooring light) coming out from the mast go through a goose neck to get below the deck. For some reason – Had someone stepped on it? Got a line got caught in it? – the goose neck bent and cut the 2 electric cables right at the mast exit. When looking at the repair work, it was obvious that I had to change that. The steaming light electric cable has been replaced (not easy, but we did it!) and for the mooring light the only option was to make a new repair (mast would need to be unstepped to have this cable replaced too). Then the goose neck’s flange (stainless steel) was hammered back flat and mounted back on deck with new bolts (and Sikaflex – the glue/sealant that keep all boats in one piece around the world).
Electronics
After some brainstorming, we decided to take our cockpit instruments and auto-pilot through an upgrade. While I am reluctant to change something that is working almost properly, our electronics were obsolete and getting parts was getting difficult. In fact, getting replacement parts was more difficult/expensive than upgrading the parts.
By changing the instruments in the cockpit, we would be able to control a new autopilot (SIMRAD’s NAC-3) or our old autopilot (SIMRAD’s AC42) as a back up – getting full redundancy was also a goal: we now have enough spare parts to build a secondary network (with instruments, autopilot, wind vane, cables, etc.)
I choosed to have 2 IS42 display and one AP44 autopilot controller behind each wheel. The two identical groups of instruments can be put in sleep mode separately, so that we have only one side in use at a time – which is nice on long passages. We don’t use a fixed chart plotter in the cockpit or at the chart table, the new instruments can display AIS targets which is also nice for passages: we don’t have to have our Android ‘plotters’ with us. We used to rely on Navionics‘ app, but I have since then discovered the iSailor app from Transas marine chart editor. iSailor, after buying some charts and options, can connect to our standard NMEA wifi output and display AIS targets, boat data (GPS, wind, depth, speed, heading, etc…) – which is a killer feature still missing on Navionics. Also the iSailor/Transas marine charts are nicer – but that’s only personal taste.
After some long hours spent in the stern locker, I changed the complete cables from old SimNet to standard NMEA2000 with standard micro-C connectors for the new instruments and autopilot. Half of the boat is now using SimNet cables (which are really great… but now obsolete) and the other half is using NMEA2000 cables, which is future proof (until the marine industry change that again…). Changing the cables was quite a long process because those cables had been put in place during the boat’s construction and were tied to many more cables, from port to starboard. I took some time to free it all, sort and clean, remove some unused cables, pull a new one from the chart table (for the hydrogenerator), put the new cables in place, tie it all again properly and add many labels everywhere with the Dymo.
Here is the updated diagram for Soledad’s electronics (2018).
Hydrogenerator
While checking electronic instruments on the Internet, I discovered that Watt&Sea had release a new hydrogenerator. It’s basically the same than the one that hangs on the transom, but this one is a ‘pod‘: It is permanently installed behind the keel.
We like to have the transom free to lift the dinghy on the davits – but this means nothing can be installed on the transom – no hydrogenerator, no wind vane. The pod leaves the transom free, but if weeds or fishing lines get caught in it… someone will have to dive.
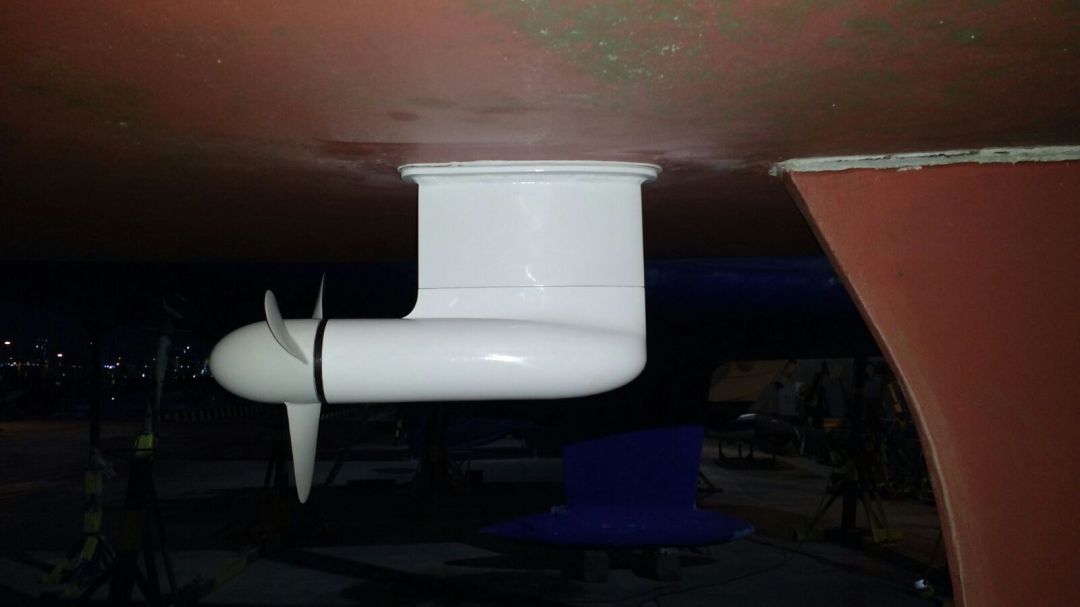
After some discussion on myhanse.com forums and with Watt&Sea customer support, I did some measurements and found the ideal place for the hydrogen. It is well protected by the keel and not in the way of a thick structural part of the hull that would have made the installation impossible.
It comes with its own MPPT charge controller, which has an additional input for the solar panels. I got rid of our current MPPT solar charge controller: it is now sailing with friends who helped us a great deal with the boat works (thank you!)
It comes with a relay that shortcuts the 3 phases of the hydrogenerator, which stops the prop. When activating the relay, the 3 phases are connected to the charge controller, the prop starts turning with the boat and batteries are charging. I placed the switch for controlling the relay in the cockpit.
So far, we just did two small passages (100 nm and 300 nm) with the hydrogenerator, and so far it is performing up to the its specifications – I’ll write a details post about it some time in the future. It does make some noise when spinning, but that’s OK. At 6 knots, you barely notice it from the cockpit and I feel quite OK sleeping in the saloon at night – which I would not do with the diesel engine on.
Steering – final adjustments

On our last passage to Las Palmas from Arrecife, the steering system (that I had took apart in Puerto Sherry) got a bit loose and the autopilot was not happy about that: the electric motor’s sprocket was jumping on the chain on heavy loads (e.g. big side waves). I knew the fix was easy (putting back some tension in the chain/cable by turning a couple of nuts), but I was tired of opening both aft cabins to get access to it… and most probably afraid of discovering something else. But sailing with the steering loose was not an option and it had to be done. After discussing with Timo from S/V Dunia, he told me that it is normal that chains and cables get some play after the first days of use (like on a motorbike). Also, I had put a lot of Sikaflex when re-installing the pedestals and it might just have got thinner after some time – I was thinking.

Timo and I opened the aft cabins panels and had a good look at the steering. Nothing special was discovered, except that the 4 M10 nylstop nuts on each pedestal were now quite loose. The pedestals were now ‘sitting lower’ than the last time I checked in Cadiz. Could it be the Sikaflex that got thinner? Could be… but now I remember that the teak in the cockpit floor was complitely damp when I reinstalled the pedestals in Cadiz. It had been raining the whole week while the pedestals were getting painted – I even had bowls to collect the water dripping in. Also, the nights were quite wet in Morocco… So yes, I think it took one month for the teak to completely dry and get back to it’s original thickness. A ½ mm difference in the Sikaflex/teak thickness makes a 2 mm change in the steering line (going up and down on each side), which is something you notice on the wheels. For the same reason, the tension final adjustment is a long process because you need to proceed carefully (tighten the nuts on the quadrant, turn the rudder from one side to the other to spread the tension evenly, control the feeling on the wheels… and start again until the tension is perfect).
We also took the time to lift the quadrant by around 5 mm, so that it aligns perfectly with the sheaves. I am still very not impressed but the work done in France when Soledad was commissioned 10 years ago. We have fixed most of the defects (jib furler, rigging, steering, electronics, etc.) over the last 5 years, but we are still annoyed from time to time by the consequences of this bad job.
Battery charger and battery cables
Two days before flying back to France, the shore power charger died. After many tests, I concluded that it had just died: nothing on the 3 outputs. I checked the manual, controlled the LED lights. I checked the internet for a replacement: a 50 Amp battery charger with 3 outputs is not cheap… but in fact, it was way too powerful for our needs. I went for a Mastervolt ChargeMaster 12/25-3 (which means 12 V, 25 A max on 3 outputs – recommended for battery banks from 50 Ah to 250 Ah). It is slightly too small for our service bank (270 Ah), but perfect for the engine bank and windlass bank (both 54 Ah each). Over the last months in the marina, it proved to be up to the task. The only down side is that it has a fan that runs even when it is not doing much, but that’s OK.
Again, the most difficult part was to get the old charger out of the technical locker… it was installed in there before the locker was built, most probably. I took this opportunity to re-route some cables, remove some useless ones and change the solar panels connection while I was at it.
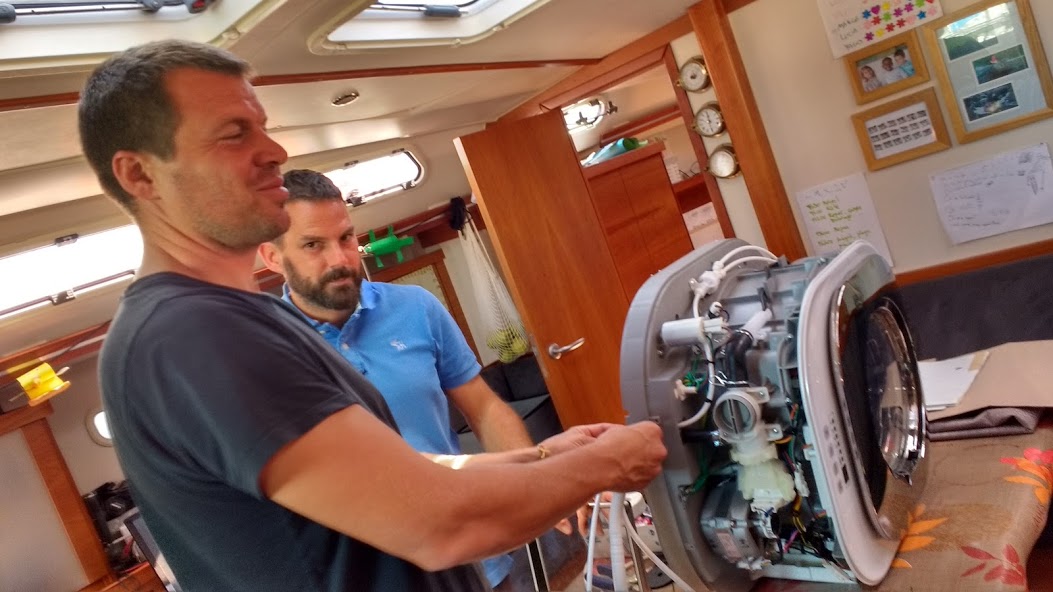
Washing machine
We (I mean María) got a Daewoo Mini washing machine shipped from France (they don’t sell it in Spain). It fits perfectly in the aft heads, over the useless seat in the shower. We went into the city to get some 18 mm plywood cut, then Timo and I built a frame with the wood panels, with dowels, glue and screws. The back is 36 mm (2 boards). I painted it with 2 coats of high resistance paint, added a layer of Sikaflex below the bottom board… and it was ready in a week time. The support has then been bolted to the GRP moulding of the shower.
The machine gets the fresh water from the shower tap (so we can feed it with hot water if need be), via a 3-way manifold. so it is still possible to use the shower (we don’t use it, we store our wet suits there) or to connect directly a hose from the marina to not use our fresh water pump. The drump motor is only 135 W, so it should be OK to run the machine on our inverter.
Sails work

We got a self-tacking clew board installed on the staysail and also UV protection cloth added to the sail. I finished to remove the last blocks on the boom and main sheet traveller, replacing them with friction rings (4 blocks were removed) ; 3 of those blocks were swinging across the cockpit every time we tacked of gybed… I prefer to get hit by a friction ring 🙂
I checked the main sail’s Harken batten cars and I noticed one batten box’ stud was too loose (they have to be loose so that the batten box can swivel around the car, but this one was way too loose). I finished some rope works on the friction rings for the reefing lines while at it. Then I lubed all the cars and the main sail was ready for some more sailing.
The jib got some proper sheets (14 mm) for when the self tacking sheet is mounted on the staysail, with inhaulers to get the same angle than when using the self-tacking sheet. The main sheet and self tacking sheet (both changed in Cartagena) have been replaced with proper 12 mm dyneema double braid rope (that I brought back from France in my back pack).
Apart from those small tasks, there was not much to do 🙂
Stove works
We like when kids are cooking and they like cooking. Sometimes it goes wrong… this time we had bechamel sauce all over the place. We had to take the oven out to clean the mess. Once cleaned, I went on and fixed the door of the oven – some screws were loose. I also replaced a bunch of rusty screws all around. As usual, simple tasks can take quite a while when rust gets in the way.
Step/locker in the forward cabin

I cut some leftover plywood and got a pretty basic locker ready for the forward cabin. We use it as a step to get into the bed. Maria got some brown synthetic leather for cheap and it covered it to make it look less ugly. During the latest passages, I discovered a bonus feature: standing on it I can put my head trough the hatch and see the sea ahead 🙂
Various small work

When the boat was on the hard, I installed a new thru-hull for the watermaker intake. The new fitting is located in the same area than the speedometer, in an area where the hull is solid and not sandwich – you don’t want any water to enter the core of the sandwich. On the picture, you can see, from bottom to top, the red soft antifouling layers, the light grey hard antifouling and sealing epoxy layers, the dark green gelcoat of the hull, and the many fiberglass / epoxy layers.
The main engine is cooled with water from the sea passing through the sail-drive… the gate valve for this hose is mounted directly on the top of the sail-drive and is seized (opened). From what I read everywhere, it’s better not to touch it (difficult to remove, risk of damaging the sail-drive, etc.) Not being able to close this valve is a danger and also not practical at all when changing the water pump impeller ; to fix that, I got a new valve from Trudesign (no risk of corrosion between the sail-drive, the valve and the engine). The valve is installed between the sail-drive’s seized valve and the sea water strainer.
Conclusion
We had a very nice winter in Las Palmas, visiting and resting. We also got rid of most of the items on our backlog (and the kids made some serious progress on their school works!). The yard and chandelry in the marina have been nice and very helpful. For many parts (electrical cables, electronic components, plywood, etc.) the city provides everything we needed. After 3 months, we were really eager to go back sailing again and spend some nights on anchor.
If you enjoyed this post, please feel free to share 🙂

Merci pour les nouvelles de vous et des modifications de votre bateau
Nous avons mis aussi une machine a laver daewoo
Bonne navigation on vous suit avec l’ais et marine trafic
Cordialement fabienne et francois
LikeLiked by 1 person