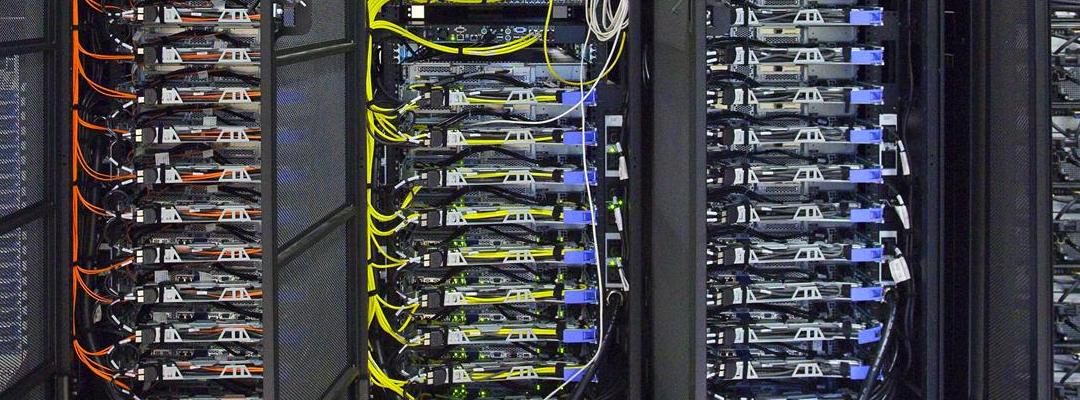
As explained in our previous post, we have been working on improving the balance between electrical production and consumption over the last 4 years. While at it, we had to adapt, reorganize, rewire quite a bit of the electronic devices on board.
Agile to the rescue
When reducing our electrical needs, the first step has been to progressively decommission the aging devices with a large screen: the old chart plotter and the semi-functional AIS. A modern GPS (SIMRAD GP25) was fitted and a powerful AIS + NMEA to WiFi Gateway (Vesper Marine XB-8000) came on board.
At that point, we knew that the electronic stack on board was about to become complex – not for the thrill of it, but because we always thought that with good input data (AIS data, Grib weather files from the internet, a nice way of displaying and sharing all this data, etc.), you can make informed – and hopefully better – decisions.
Taking the right decision can make the difference between an enjoyable trip and a dangerous ride.
While more capable electronics are useful, complexity is not your friend at sea. When sailing, you need systems that just work… or that can fail gracefully, at least. In order to deal with this growing complexity, we decided to cut it into manageable chunks with some 功夫 (Agile-Fu). Each chunk of the system provides a single service; each service should be independent from the others and should provide a bit of redundancy.
This was an ambitious work, but by dealing with small manageable chunks, we did it! Of course, the results of this work are probably not much different from the results one could have obtained otherwise (using a different approach). As usual, the journey is more important that the destination: in our case, the agile methodology insured that every chunk had a well defined purpose. And by setting a minimum viable set of functionality for each chunk, we knew exactly when the chunk was good enough for us and could be considered as “done“.
By doing so, we were also able to work on the electronic stack by iterations: we got it all done over the last 4 years, and every summer we had working electronics on board.
Sorting devices by purpose
To give a concrete view of the results, here is how the groups of devices are organised on board Soledad, in 2017. Each “manageable chunk” became a group of devices:
- Instruments: NMEA2000 backbone (wind, depth/speed/temp, GPS, gyro-compass, rudder feedback)
- Autopilot: autopilot calculator and actuator
- Radio: VHF Antenna splitter
- AIS / Gateway: AIS / NMEA2000 to wifi gateway
- Navigation: portable devices
- VHF: VHF radio
- VHF subgroup: Bluetooth VHF handset
- FM radio: FM/stereo
- AIS / Gateway: AIS / NMEA2000 to wifi gateway
- Navigation: navigation computer
- Screen: navigation computer’s screen
- Ethernet/WiFi intranet: WiFi/ethernet router
- Internet: Internet 4G access
- Network storage: NAS
Each group is autonomous and only depends on its “parent” group in the hierarchy. Some groups can provide better functionality when other groups are up and running.
e.g. For the autopilot to work, the basic navigation package needs to be “on”.
e.g. The VHF Bluetooth handset needs the VHF to be “on”, which in turn needs the VHF antenna splitter to be “on”.
Splitting devices into logical groups helps to separate the different services, and makes sure that each group is viable in a standalone mode. It also helps to ensure redundancy for critical services.
e.g. AIS service and “instruments” service are on 2 separate groups: both groups have their own GPS (all Class B AIS transponders have their own GPS). The DSC VHF (which needs a GPS position for DSC emergency calls) is physically linked to both groups and has access to GPS data from any of the groups.
It has been extremely useful in the electrical consumption reduction process. Now, the basic “navigation” mode includes only the following:
- The basic navigation package (with autopilot, optionally)
- The radio group (antenna splitter) with the VHF radio
This means, no chart plotter, no monitor/screen… but a fully working autopilot in all modes (wind, no drift, fixed course), with minimal electrical needs.
The basic “watching-a-film-while-anchored” configuration includes:
- The ethernet/wifi intranet group with the NAS up and runnig
- The navigation computer with its screen
Here is diagram of the current networks on board Soledad. All it took was a bit (to say the least) of planning, head scratching and finding information (mostly technical specifications) for some of the devices ; the rest was “just” moving cables around and making new connections.
For the rest of this post, here are a few sections about electronics and working on electronics on board, in a “brain dump” format.
Using standard electronic devices on a boat
Selecting good candidates
As you might have guessed from the above diagram, several devices in use on board originate from the mass market (i.e. they are not “marine” devices), namely:
- Our D-Link DWR-921 4G router
- The Minix Z64A SoC computer (used for navigation)
- The Synology DS116 NAS
- The Philips 22″ monitor (227E6LDSD/00)
Of course, the main reason behind this is the big savings compared to “marine” specific devices. It is also nice to work with devices that are not using obscure protocols, wire/plugs formats… but selecting which devices are acceptable is a tedious process. Here are the criterion we use when hunting:
- Make sure the devices runs on 12V (or 5V – like all USB devices)
- Prefer sealed devices (or at least without fans)
- Make sure their power needs are low (keep an eye on devices designed for cars: they usually have a poor efficiency)
- Make sure to use a voltage stabilizer to feed them with clean 12V
- Install those devices in dry/protected places
- Fill all empty ports (USB, ethernet, VGA, etc.) with silicon plugs
Wiring and connecting devices
To wire any devices on board, it is very important to make good connections: use heat-shrink wrapping and soldering, use large section cables (2 x 2.5 mm² – which corresponds to 14 AWG, if you are from over there), prefer cables with “tinned” conductors, prefer rubber external jacket over a PVC jacket (rubber is resistant to oil, petrol and abrasion), use waterproof boxes to protect your Wago® connectors.
Every time we did not follow those rules, we ended up regretting it.
FYI, the European harmonized code for such cables is:
H07RN-F 2 x 2.5 mm²
|| || | |   |_ 2.5 mm² per conductor
|| || | |_____ 2 conductors
|| || |_______ Finely stranded (i.e. flexible)
|| ||_________ Neoprene conductor jacket
|| |__________ Rubber outer jacket (oil, petrol, abrasion...)
||____________ 450V to 750V rating (that should be enough :-)
|_____________ H for "Harmonized" standard notation
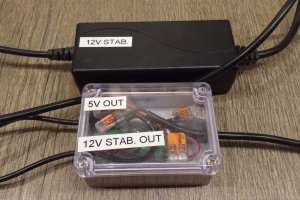
Protecting devices from electrical surges
For 12V devices, we like to use a voltage stabilizer. If you think about the voltage changes when the engine’s alternator kicks in or when the main sail comes and goes over the solar panels, you understand the need to protect those fragile devices from the surges. Those voltage stabilizers (usually) consume very little and can save your electronics.
To feed 5V devices from 12V, we use a UBEC – a DC Step-down, designed to deliver clean 5V voltage from anything between 6 to 24 V, in harsh environments (e.g. radio-controlled drones and cars), with a very high efficiency and top reliability. And on top of that, they cost next to nothing!
To plug new devices on the electrical circuit, common sense practices are required. Never connect anything directly to the batteries. Use available spare circuits, or create new one properly: add a switch panel (protected by a main fuse) offering more fuse-protected circuits and add a circuit breaker for this new switch panel.
About “marine” devices
Marine specific devices are not bad :-). Actually, manufacturers have come a long way in the recent years to offer instruments that respect open standards. WiFi and Bluetooth are now well accepted, just to name the two of them.
Still, water, salt, rain, sun are cruel daily companions for those devices and losing a “marine” device that costs several hundreds (€, $,or £, etc.) is always a (big) pain ; most of the time they are not design to be serviceable for various reasons (being technical or marketing). So, when possible, we like to look at alternatives. For in-cockpit fixed instruments, there is no other sane option than a using marine specific instruments.
Over the last 4 years, we had a love/hate relationship with the electronics on board. And then, you get to know a device (the XB-8000), developed and supported by very friendly company (Vesper Marine in NZ) and your faith in marine electronics is fully restored – their products are very good and improving with each software release, and their support is great.
About handheld devices
Thanks to our NMEA to WiFi gateway, our phones, naviagation phablet and tablet can act as navigation instruments (we chose them waterproof, to be on the safe side). They makes precious secondary devices, should the chart plotter fail or the main GPS go crazy. Also, these devices use a different set of charts than the main chart plotter (redundancy!). Last but not least, they have a legal purpose: of the 3 sets of charts on board (2 in electronic format, 1 in paper format), these charts are the only ones on board that are maintained up-to-date. Yes, you guess right, marine charts are expensive.
One of the most useful handheld device we have on board is a phablet (Sony Z Ultra, waterproof, with a rubber case). When looking for the best spot to drop anchor, if gives detailed soundings of the area (from the Navionics charts) and shows the depth from the transducer in real time (from the NMEA gateway). No need to shout from the bow to get the data. The size of the screen (6.4″) makes it ideal to carry around and to check charts on a decent screen.
Computers and software
Charging laptops
To charge our laptops, we are in the process of setting up a fixed 19V circuit on board (using a spare circuit on the switch panel, a 12V to 19V DC/DC step up converter – aka: car adapter for laptops – with specific outlets/plugs). We will be able to activate the 19V circuit easily without any inverter involved: we think that the “12V DC -> 240 V AC -> 19V DC” route is not the smartest way to go. Also, a few other devices on board can charge with a 19V DC circuit (the kitchen’s blender!)
Software on board
This is a personal choice, we have never been quite comfortable with Apple or Microsoft products, so we stick to Linux (Gentoo, Kubuntu) and Android. Counting our phones (2), the phablet, the tablet, our laptops (2), the navigation computer, the XB-8000… that is 8 linux kernels running on board 🙂
For navigation, we like OpenCPN, zyGrib, XEphem on the computers (laptops and navigation). The WatchMate application from Vesper Marine works really well to get all AIS (and instruments: depth, wind, etc.) related information from anywhere on board.
Did we miss something? Are we doing something totally wrong?
Feel free to leave a comment below!

Bonjour Pierre-Olivier.
I have a 2013 Hanse 415. I installed the Vesper Marine XB-8000 AIS last season. I use WatchMate on my iPad. In addition I have a Bluetooth GPS & iSailor charts on the iPad because the AIS info can be displayed. Navionics charts (last year) on their App would not do this. I am having a B&G Zeus3 12 inch Plotter fitted to replace our lightning damaged Simrad NSS12. This model now has built-in wifi so no need to install a Go-free unit to display all the nav data on a tablet.
I was interested to read your comment, The WatchMate application ………. works really well to get all AIS (and instruments: depth, wind, etc.) ………. from anywhere on board”. How do you get this non-AIS info via WatchMate?
LikeLike
Hi Nigel,
Thanks for your comments !
– You are right, Navionics app does not display navigation info – though it can connect to GoFree WiFi to collect the soundings… it’s a shame. That would make one great feature: I would love to have the current depth overlayed on the chart – not to mention AIS data. There are lots of apps that can connect to the VesperMarine XB-8000 and read the standard/classic NMEA0183 sentences (I think NKE developped one app, etc.)… but Navionics is way behind on this.
– IMHO, the GoFree was a nice idea from Navico: it gives access to the NMEA data over the WiFi. But for various reason they kept it way too “closed”. Access only possible using Navico apps, you needed to sign-up Non Disclosure Agreements to develop for it (If I remember correctly) – especially if you wanted to send data to the NMEA network (e.g. send navigation data). Correct me if that’s better now in 2017. Let’s hope the B&G Zeus3 is more friendly !
– On the WatchMate application (Android version – I have never used the iPad version), there is the 3rd tab: it contains navigation data (Position, COG, SOG, HDG, DPT, AWA, AWS). No way to customise it (for now?)… but at least it is present ! Previously, the “Depth” information was not taking the transducer offset into account, but it’s been fixed in late 2016.
LikeLike
Bonjour Pierre-Olivier
To use Wago connectors with stranded wire do you tin them with a soldering iron? I’ve tried before & these connectors only seem to work with solid core cable.
For charging portable telephones I’ve installed car type 12v sockets not USB sockets. What do you see as the advantage of USB sockets when you have to install a UBEC to step-down from 12v to 5v. Seems like more work but then I’m not supper technical!.
Nigel
LikeLike
Bonjour Pierre-Olivier
If I use a 12v to 19v step-up transformer for charging a laptop do you think that the 12v supply also needs a voltage stabilizer in the circuit also?
I have an LCD TV which I’m installing. It uses a 220v supply for a transformer to power the TV. Is there a standard votage fot this type of TV. The existing transformer is on the boat so I can’t check it. Obviously if there is a way of powering it without using the inverter it would be more efficient.
We had so many electrical issues last year even though the boat was only 3 years old. The bow thruster & engine starting batteries are having to be replaced. I’m keen to cut unavoidable energy consumption where ever possible. We’ve added a “Sterling Power” Alternator to Battery charger to provide better house battery charging. I’m hoping to move the engine starting battery out of the engine compartment as it gets too hot. This has contributed to it’s short life. Additionally we are adding “Victron Energy” digital battery monitor for the house batteries with a central display connected to Inverter, solar controller & battery monitor. There will be a “SmartGuage” digital battery monitor for the thruster but this is not connected to the central display. I’ve done this because the truster battery is charged by a “Sterling Power” battery to battery charger. Due to inaddiquate charging of the house batteries I think the thruster battery suffered to the point of no return & died! This way I will be able to see that battery condition more easily. Finally I’m stepping up the solar charging by adding a third panel of 120w to compliment the other 2 panels of the same output. Any thoughts would be welcome as I’m looking to have an “issue-free” season.
Nigel
LikeLike
Replying here because I can’t reply to your other message.
Hi Nigel,
12V to 19V step-up DC converter are usually made for cars and can handle the various hiccups on the 12V system ; I am not considering getting one for my 19V circuit.
I’m afraid there is nothing standard for TVs (even for computers) – it will most probably be something between 12 and 20 V. Try your luck and get the information from the manufacturer’s website or from google.
For your bow thruster battery, when you are operating the thruster with the engine on, you get that flow: engine’s alternator -> service batteries -> BtoB charger -> thruster battery -> thruster. I am no specialist, but you’d better have a powerful BtoB charger (high charge intensity), otherwise when you stop the engine:
– the service batteries are full and the thruster battery is not
– then, then BtoB charger continue its work until all banks (service and thruster) are equally charged (but not full)
On our 430, the alternator charges the 3 banks at the same time. When dropping anchor, we try to let the engine running some extra time just to make sure the windlass’ battery recovers. With a full windlass battery, we are sure to get the anchor up, even if the engine does not start. I notice that, even though the alternators charges directly the battery, it really takes quite some time to get the battery fully charged again. With your charging flow, it might even be longer to get the thruster battery fully filled up.
I guess Hanse expects that you use the thruster to get into the marina (and then charge with shore power) or to get out of the marina (and run the engine to charge). Or maybe this is your 4th battery bank on board ? Maybe it was cheaper to go that way than to find a 4-way charge regulator for the alternator… who knows.
It takes some time, trials and errors, to make the system work according to your needs – being the boat new or second hand. It took us 4 years! The important idea is to know what you want and that every change you make goes into that direction.
It is always good to have battery monitors, it is a valuable help to see where the electricity is going.
For solar panels, it is important to plan how you are going to make your panels work together. Based on the number of cells they are made of, some panels will provide a voltage (± 16V) that is not high enough to charge the 12V batteries efficiently, so you’ll have to arrange them in series to increase the global voltage ; other panels have more cells and provide a higher voltage, they can be used in parallel (which has some interesting pros).
I guess your 130W panels have enough cells to provide a high voltage (± 19 V) and can be used the 3 in a parallel arrangement.
I hope you’ll get a trouble-free season !
LikeLike
Bonjour Pierre-Olivier
Thanks for the observations.
BtoB charger for the Thruster is rated at 20Amps. From memory the solar panel voltage output is about 25volts, so we should be OK with all in parallel.
My partner Laurence cannot believe we need to make so many changes to a new boat. She has little experience of boating & thinks it should be cabably of doing everything without modification. I’m trying to educate her to the fact that modern boat builders make boats to a formulae & that we need a different formulae!
Nigel
LikeLike
Hi again Nigel,
Yes, there are 2 types of Wago connectors:
– some are made for solid core cables (you’ll find them easily in hardware stores)… you can try tinning your standed wires, but you’ll never manage to get a 2.5 mm² tinned wired inside a 2.5 mm² size Wago (I made this mistake too).
– some others are made for stranded (or cored) wires and have a small handle on the top to open and close – like the S221 series (http://amzn.to/2mb9PMh) or the cheaper S222 series (http://amzn.to/2nIw7V2)
We also have 12v sockets + the usual USB car adapters for phone/tablet charging, you are right that’s the easiest way to go. We use 12V to 5V UBEC to power our computer (MINIX Z64A) because a UBEC can deliver more current (up to 10A) than a car USB adapter (usually 2.1A max). The computer came with a 4A / 240VAC to 5VDC adapter, so a USB car adapter was not suitable.
Using a UBEC to power 4 USB cables (for phone/tablert charging), instead of using 2 double USB car adapters, would also be a nice solution (more work I agree, but should be more efficient).
Hope it helps!
LikeLike
Very Interesting approach, especially the NAS+Minix. thanks for sharing
LikeLike
We have lots of comments talking about Raspberry Pi SoC – either to build a NAS or a navigation computer. Raspbery Pi is a fantastic platform, but it has some shortcomings (no clock, casings are funky, …). The Minix are great computers (very small, totally closed enclosure, low power, intel 64 bits, HDMI out, ethernet, WiFi, etc.). The only down side is that this model (Z64A) requires a specific *ubuntu version (from linuxium – a specific kernel, the rest is stock). If I were to replace it, I’ll go for the Minix NGC-1 (aluminum enclosure, fully linux compatible – but it only comes with Windows, so I would have to pay for a licence would throw away – grrrr).
We had a EDS14 (from Synology) which is made to be embedded on board cars/buses (powered with 12V directly). Unfortunately, this device does not have a proper power management system (i.e. planned on and off cycles) – it can not even turn off by itself! We moved on to the DS116, which is a great device: runs on 12V, supports on/off cycles, supports wake on LAN. I installed a Western Digital disk (2.5″, red series, with the adapter) ; this disk is amazing: very efficient (very low power and no heating). The DS116 can run without the fan on in normal conditions, it needs LESS power than the EDS14 (with a USB disk attached). This DS116 with the WD red is a great combo.
I’ve done some measurements in real conditions with a multi-meter, and I will probably post a quick test summary soon to give power figures for the Minix, EDS14 and DS116. I’m curious to see how they compare to a Raspberry Pi.
LikeLike